Creating a new Team
You need to use the MyHub application in Teams to create a new team - not the Join or Create button.
Some important information
- Any staff or student can create a team and invite other students or staff. Obviously don't add people who you don't know or who won't be interested in your team - that's spamming.
- You cannot add anyone outside the University or use someone's @aucklanduni.ac.nz email address.
- When there is more than one person with the same name, note that staff members will have their role listed after their name. Students won't have this.
- You must nominate two contacts to create a team. These people need to know the purpose of the team and will receive emails a few times a year checking that the team is still required. Normally you use the same people as both contacts and owners.
Good practises for team owners
- Keep the team name short so that it's easy to identify within the Teams client.
- Use a team name that's relevant and doesn't reference an individual (e.g. "Project XYZ" rather than "Dave's Project 2").
- Add tabs at the top of the team site linking to information (or even external websites) that people in the team will find useful.
- Don't add too many channels. A good practise is to only create a channel for a subgroup of people in the team, not a channel for each activity. E.g. channels for "Designers", "Technical" and "Finance" makes sense whereas channels for "Planning", "Design", "Implementation", "Security Checking" will create a poor and disjointed experience. If you're not sure, only add channels later when you see a need - don't try and pre-guess what they should be.
- Before you add people to the team, add some interesting content and a welcome message to the General channel chat. Your team members will use the team more if their first experience of it is welcoming.
- Don't add people to a team unless they need to be part of it. Nobody likes being spammed.
- Regularly look at the team members and make sure you remove people who no longer need access.
- If you receive an automated "MyHub" email, make sure you respond to it. If you keep ignoring them then your team will be archived.
- Add a unique photo or graphic to the team profile to make it stand out.
Instructions
1. Within either the Teams desktop client or through https://teams.office.com go to the MyHub icon in the top left. If you don't see MyHub you will need to add it:
1.1 Go to the Apps icon in the bottom left
1.2 Search for MyHub
1.3 Open it and click Add
2. Click on Start a request

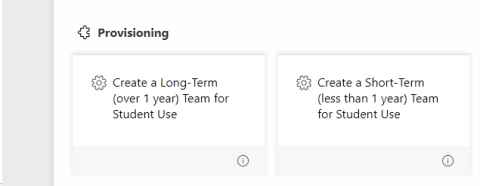
3. Under Provisioning select the appropriate team. While these timings aren't set in stone they're useful to indicate either a long-term team that will continue across multiple years (e.g. a club team) or a short-term team that will be unlikely to last more than a year.

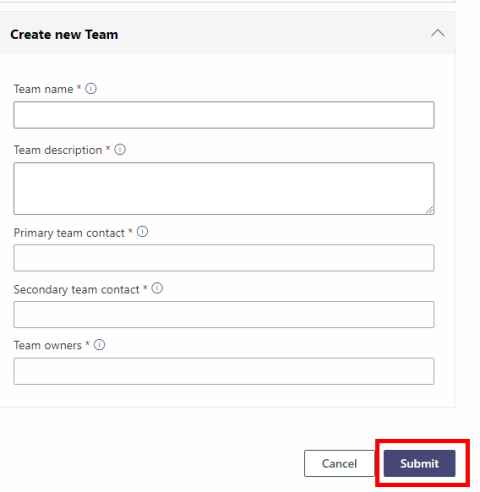
4. The Create a New Team form appears. Fill in the details:
Request Summary: Enter information about what the team will be used for and by what group of people.
Notes to Approvers: You don't need to enter anything in Notes for Approvers - the team is automatically created.
University Code of Conduct. Remember that MS Teams is a University-managed system and the University does have the ability to conduct audit investigations into content posted.
Team name: Enter the name of the team. This is what will be displayed in the teams client, so make sure there's no typos, the name makes sense and there's no derogatory or abusive team names.
Team description: You can copy and paste the same information from Request Summary.
Primary team contact: It will automatically put your name here. You can change it to any current University of Auckland student or staff member. The team contact will receive an email if the team is unused for over 6 months or there are no owners. Note that just because you are a team contact doesn't make you a team owner.
Secondary team contact: Enter the name of a second contact (they also must be a current University of Auckland student or staff member). They receive the same emails as the primary contact.
Team owners: Add at least two owners of the team. This ensures that there is always someone with permissions to manage the team.
5. Click on Submit. Within 5 minutes your team site will be automatically created. There is no team or IT person that needs to make this happen.

Creating a team that people can join without approval
At any stage after you have created a team, a team owner can generate a code to allow others to join the team just using the code. This doesn't require you to add members to the team or force them to wait for approval.
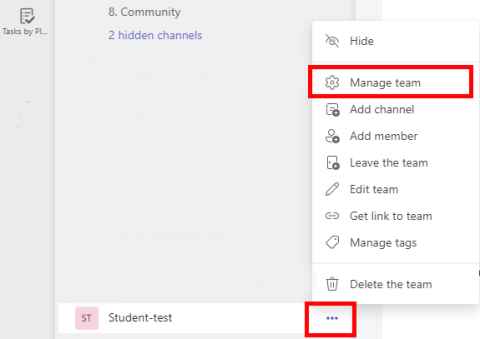
- Right click on the 3 dots to the right of the team name in the Teams client.
- Click on Manage team.
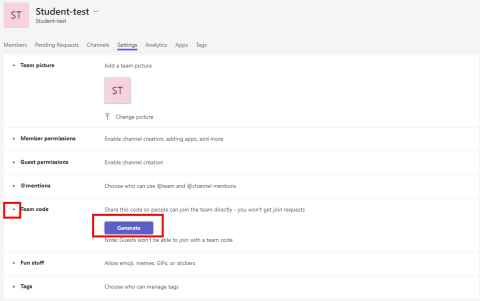
- Go to Settings on the top menu.
- Expand Team code with the drop down arrow.
- Click Generate code. If it just shows a code then this means someone has already generated one.
- Click Copy to copy it to the clipboard.


Next Steps
Checking the Team settings
- Right click on the ... to the right of the new team name in the Teams client
- Click on Manage Team
- Click on Settings in the top menu. Some settings you may want to change are:
- Team picture (this is an icon for the team. You can upload any picture but it needs to be small to fit)
- Fun stuff
- Enable Giphy for this team (default is yes)
- Filter out inappropriate content (default is Moderate but can be increased to Strict)
- Member permissions
- Normally the only two options you'd have enabled would be Give members the option to delete their messages and Give members the option to edit their messages.
- Normally the only two options you'd have enabled would be Give members the option to delete their messages and Give members the option to edit their messages.
- Click on Members and make sure that you have multiple owners of the team. If the team is going to exist for more than one year make sure that not all the owners are expected to leave at the same time.
Limiting who can post in the General channel
When a team is created a General channel is automatically created. You cannot remove it or rename it.
- Go to the General channel, right click on the ... and click Manage Channel
- If you are going to be creating multiple channels and you want to ensure that people only post messages in the channels you create, then change Permissions to Only owners can post messages
Creating a new channel
Think of a channel as an area where people who'd normally work together will collaborate. If you have a team for your club then you may have a channel for the Committee, another for Events, one for Finances etc.
- Right click on the ... to the right of the Team and click Add channel
- Add a name for the channel and it's always helpful to add a description. Channel names can't contain the following characters: ~ # % & * { } + / \ : < > ? | ' " , or the word “forms”. Channel names also can't start with an underscore ( _ ) or period ( . ), or end with a period ( . )
- You now need to choose from the 3 channel types. You have to think this through carefully as once you've created a channel while you can rename it, you can't convert it to a different type:
- Standard - this will be the type that suits most use cases. It allows anyone in the team to access it. Think of it like an open room.
- Private - for information and messages that you don't want all team members to be able to access. This is a locked room where only some people of the team have the key.
- Note that you can be an owner of the Team but have no access to the private channel if the private channel owner wishes. In this case the private channel owner's permissions trumps the team owner.
- When someone is removed as a team member they are also removed from any private channels in the team.
- There is a maximum of 30 private channels in a team (including private channels you may have deleted previously).
- You cannot add a Planner board to a private channel.
- Shared - if you want to share the information more broadly and with people outside the team. Note that you can't share with people from other organisations despite what it says on the dropdown.
- Once the channel is created then you can also change the channel settings using the same approach to manage the settings in the General Channel.