Move your Google Photos
How to move your Google Photos from your University Google Drive
IMPORTANT
It is critical that you delete your photos once you've moved them as Google doesn't provide administrators with any ability to delete photos, so if you don't remove them then we'll be forced to delete your entire account, including your email contents. We don't want to do this, so make sure you delete your photos.
1. Choose your new photos location
- Personal Google account. This is the easiest - just follow these instructions
- University OneDrive - not recommended as your photos will be automatically deleted when your affiliation with the University ends
- Personal OneDrive - free 15GB storage
- DropBox - free 2GB storage
- Degoo - free 100GB storage
- Local computer
2. Decide if you want to reduce the size of your photos beforehand
While all photos you upload to Google photos are stored in the original quality that you created them in, Google also has a storage saver mode that can dramatically reduce the size of the photos and video files with a minimal degradation in quality. This Google Storage Saver page covers information about this option that you should read before moving on to using Google Takeout.
3. Delete any videos you don't need
- Go to https://photos.google.com and login with your @aucklanduni.ac.nz details
- Click Explore on the left hand side
- Down the bottom of the screen select Categories > Videos
- Select the videos you don’t want and click the rubbish bin icon in
the top right - Select Move to bin
- Go to the Bin and click Empty bin
- Click Empty bin again
Watch the instruction video
4. Use Google TakeOut to download your photos
Google TakeOut can be used to export individual photo libraries or your entire photo collection in Google Photos.
- Go to https://takeout.google.com
- Sign in using your @aucklanduni.ac.nz address and usual password
- Under 1. Select data to include, click the blue Deselect all link
- Put a tick in Google Photos. If you want to only choose specific libraries then click on All photo albums included and tick the libraries you want to copy
- Scroll to the bottom of the screen and click Next step
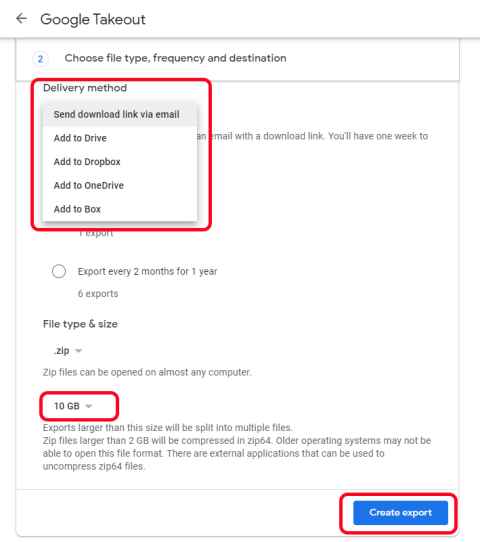
- Choose the Delivery method (normally this is send download link via email). Note that Add to OneDrive will not add to OneDrive for Business (the University's OneDrive)
- Change the file type and size to either:
- 10 GB - if you have less than 100GB of photos
- 20 GB - if you have more than 100GB of photos
- Click Create Export

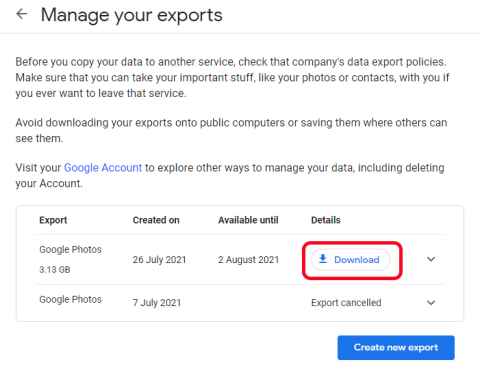
A zip file will now be created that you can open on your computer.This may take up to 24 hours. Once it's been created you will be emailed at your @aucklanduni.ac.nz email address.
Note that for each photo there is a JSON file. The JSON files are only useful if you've added comments, descriptions etc. in Google Photos.
Click on the download link.

5. Delete the JSON files
For each file there is a JSON file. This file is only useful if you have added any information like captions or descriptions to the photo within Google Photos. The information about where and when a photo was taken and any camera settings are stored in the photo file - they don't need the JSON file.
- Open the zip file(s) and extract them to folders on your computer
- Search for JSON
- Select all the files that are found (in Windows this is CTRL-A)
- Delete all the JSON files
6. Copy the files to your new service
Once you have removed the JSON files you can now copy the files to your new service. Instructions will be different for each. Your University OneDrive is only available to you while you are affiliated with the University so is not a good location for your personal photos. Here's some guides for common services, but you're not limited to using the list here - choose a service that works best for you.
7. Delete the old files
Google Transfer copies your files - it doesn't move them. Once you have checked and are happy that you have all the files you need please remove the originals from both your local computer, mobile device and University Google Drive.
Step 1: Delete the photos from your computer and mobile and turn off syncing
It is critical that you also make sure that you turn off any Google Photo's syncing on any computer or mobile device otherwise any newly taken photos will upload to your University Google Drive.
Use these instructions to Turn backup and sync off. You will need to do this for each device you have configured before moving to Step 2.
Note that the Google Photo app on a mobile device shows a combination of local photos and those on Google Drive.
Step 2: Remove photos from your University Google Drive
Note that Google uses the terms Bin and Trash to mean the same thing - on your device it may show Trash rather than Bin.The University has no ability to delete your photos for you. Remember you must do this step otherwise we will have to remove your entire account, mail, drive and photos.
To remove photos in Google:
- Go to Photos on the web on a computer (https://photos.google.com)
- Note where the Delete bin is in the top right of the screen
- Ctrl+Shift+minus to zoom out on your browser until you can only just see the check mark in the corner of an image
- Hold shift as you click the first photo
- Release shift
- PgDn 20-30 times then find another image, hold shift and click the check mark. They all turn blue down to that point
- Click the tiny top right bin Click Move to bin
The photos will be automatically removed in 30 days. Your storage allocation will change after the 30 days, or you can remove all files from the bin beforehand.
I’ve accidentally deleted folders from Google Drive, how do I get them back?
- Go to Bin on the left-hand side
- Highlight the folder or file to restore, Right-click
and select Restore