Move your files to Dropbox
How to move your Google files from your University Google Drive to Dropbox
Important - Tidy up beforehand
It's important that you tidy up your files on Google Drive before moving them. This will improve the speed of your migration and leave you with a more manageable space in Dropbox.
Follow these instructions before proceeding further: Tidying up your Google Drive
1. Request your Research Storage
The University provides active research staff with a number of storage options for research purposes only. If you are not a current researcher then this service is not available to you and you will need to sign up to your own Dropbox service.
A research dropbox may not be appropriate for your research, so it is important that you check this link and follow the instructions.
2. Copying files shared with you
Google TakeOut won't copy files that have been shared with you.
To copy them:
- Create a new folder in your Google Drive to move all your shared items into
- Go to "Shared with Me" and add all the shared items from there to the new folder in your drive
3. Use Google TakeOut to download your files
Important
Google TakeOut doesn't transfer any files in Google Photos. If you want to transfer photos you will also need to follow these instructions to transfer Google Photos.
Google TakeOut can be used to export your contents of Drive
- Go to https://takeout.google.com
- Sign in using your @aucklanduni.ac.nz address and usual password
- Under 1. Select data to include, click the blue Deselect all link
- Put a tick in Drive.
- If you don't want to migrate all folders, then click on the All drive data included button. Remove the tick from Include all files and folders in Drive, click Deselect all and select the individual folders to export then click OK. Note that you can only select top level folders. If you have files that have been shared with you, make sure you select the folder you created in the step above
- Scroll to the bottom of the screen and click Next step
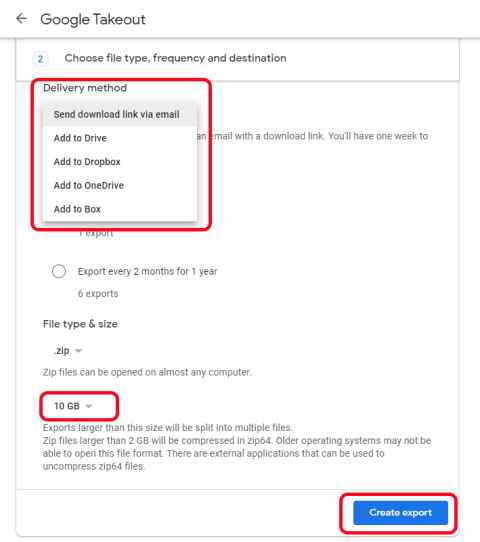
- Choose Add to Dropbox as the Delivery method
- Choose 10GB as the file size
- Click Link Accounts & Create Export
- At the "Google Download Your Data would like access to its own folder..." message click Allow

A zip file will now be created and copied to your Dropbox. This may take up to 24 hours. Once it's been created you will be emailed at your @aucklanduni.ac.nz email address.
4. Extract the files from the zip file
- Go to your Dropbox
- Click on All files and under Recent you will see the transferred files
- Click each of the zip file links and then Extract all on the top menu. Once the extraction has completed a message will be shown at the bottom of the screen
5. Check your files are OK
What WILL be Transferred
- Files in Folders in Google Drive that are OWNED by you
- Shared files that have been “Added to Drive” (Step 2 on this page) will be copied but the new file will NOT be shared with collaborators
What will NOT Transfer
- Images stored under “Google Photos”
- “Shared with Me” Files that have NOT been “Added to Drive”Google Sites, Google Forms, Google MyMaps & other third- party content in Drive
6. Move the folder (if you want to)
Once you have unzipped the files you can easily move the TakeOut folder to another location in Dropbox.
- In the left hand window, select the level above the folder you wish to move. This is likely by selecting the TakeOut folder
- Select Drive in the right window and click on the Move button in the button bar
- Browse to where you want to locate the files and click Move
7. Delete the old files
Google TakeOut copies your files - it doesn't move them. Once you have checked and are happy that you have all the files you need then you must remove the originals from your University Google Drive.
To remove files and folders in Google
- Highlight the file or folder
- Right-click and select Remove
- Click Move to bin
- They will be automatically deleted by Google after 30 days
8. Setup any sharing in Dropbox
Any existing sharing you may have setup will not come across - you will need to set this up again.
- Hover over the file or folder you want to share
- Click the share icon (person) that appears
- Type the email address or name of the person, people or group you'd like to share with
- Select Can edit from the dropdown menu
- Click Share file or Share folder
I’ve accidentally deleted folders from Google Drive, how do I get them back?
- Go to Bin on the left-hand side
- Highlight the folder or file to restore, Right-click
and select Restore